


A fire door is only as good as the way it’s fitted. Even a top-rated door will fail in a real fire if the gaps are wrong, the seals are missing, or the frame sits out of plumb. Fire door installation isn’t a job to rush.
This guide walks you through the full process in plain language: what you need, how to do it, and where most people slip up.
Materials and Tools You’ll Need
Materials
- A certified fire door — look for an ISI mark and a rating in minutes (30, 60, 90, or 120; sometimes written as EI30, EI60, and so on)
- A matching fire-rated frame (steel or treated timber)
- Intumescent seals and smoke seals
- Fire-rated mineral wool or fire mastic for packing gaps
- Intumescent sealant for the perimeter
- Fire-rated hinges, closer, latch, and handle (all certified)
Tools
- Electric drill and bits
- Spirit level (longer is better)
- Tape measure, shims or packers
- Screwdrivers, spanner, and chisel
- Caulking gun
Critical point: every component must be certified to work together. Pairing a fire-rated door with a non-rated hinge or seal cancels the whole rating.
Step 1 of 8: Survey the Opening and Take Accurate Measurements
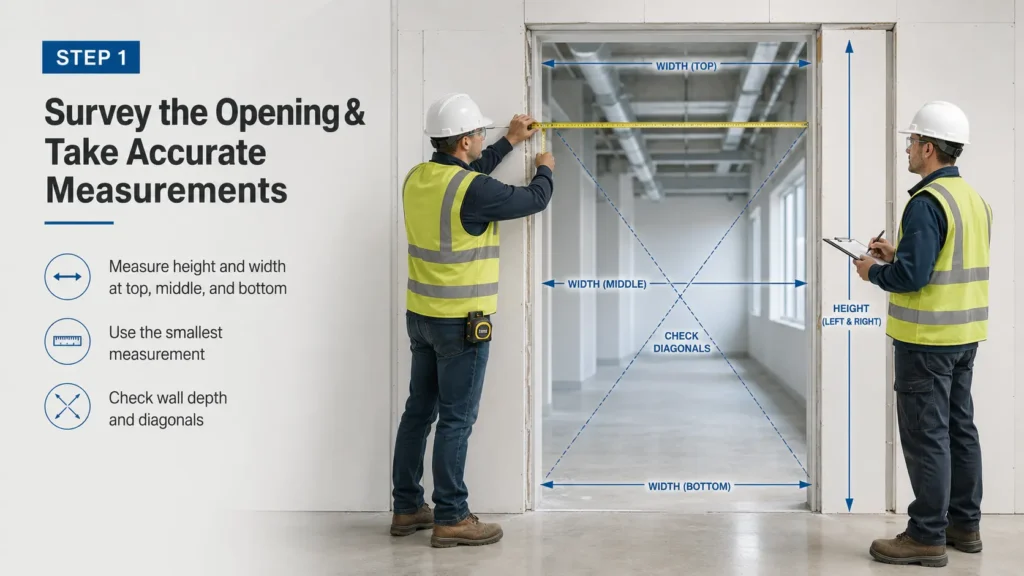
Measure the rough opening at three points — top, middle, and bottom — for both height and width. Walls aren’t always square; the smallest measurement is the one you work to. Check the wall depth too — the frame has to sit flush.
Measure the diagonals; if they don’t match, the opening is out of square and the frame will need shimming. The difference between opening and door size is your shim allowance — split it evenly on both sides to keep the door centred.
Step 2 of 8: Prepare and Align the Frame
Clean the opening of dust and debris. Lift the frame in and use a spirit level on both jambs and the head. Insert shims behind the frame at the hinge and lock points until everything reads plumb and level.
Fix the frame with long anchor screws — not short drywall screws. Fire-door frames are heavy, and the fixings need to bite into solid structure. Follow the manufacturer’s spec for fixing count and placement.
Step 3 of 8: Hang the Door and Fit the Hinges
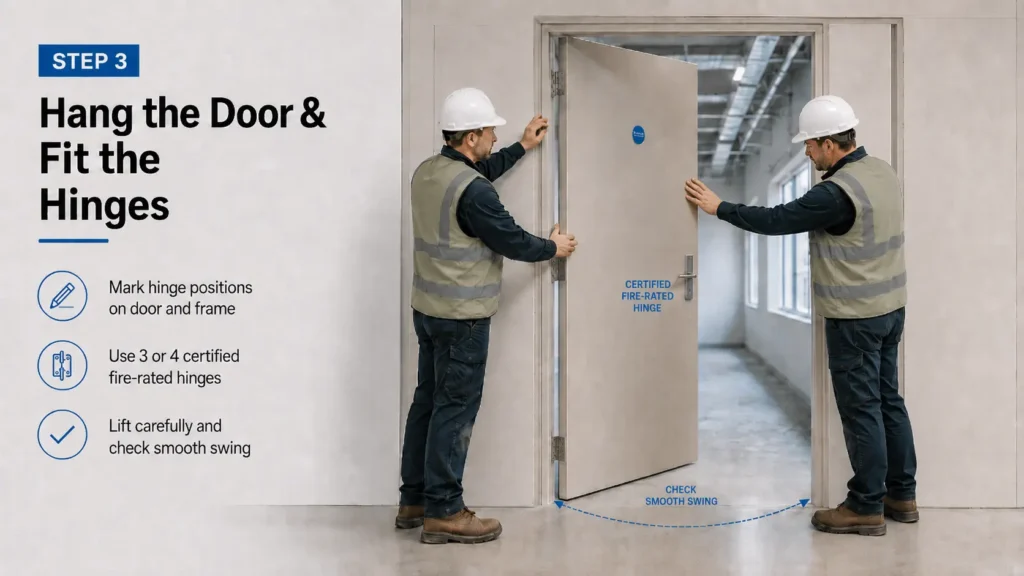
Mark the hinge positions on door and frame. Most fire doors use three or four certified hinges, evenly spaced. Chisel out the recesses if they aren’t pre-cut, then screw the hinges onto the door first.
Lift the door into the frame — a 60-minute fire door can weigh 40–50 kg, so two people minimum — and screw the other side of the hinges into the frame. Open and close the door slowly. It should swing smoothly without dragging or scraping.
Step 4 of 8: Check the Gaps and Clearances
This is the step most installers underestimate. Indian Standard IS 3614 and the National Building Code 2016 specify tight gap tolerances:
- Top and sides: typically no more than 3 mm
- Bottom: typically no more than 8 mm where there is no threshold
Verify the exact tolerances against your manufacturer’s manual. Run a feeler gauge or a 3 mm coin around the door. Too tight and the door binds; too loose and smoke gets through in a fire. Adjust the hinges or re-shim until the gap is even all the way around.
Step 5 of 8: Fit the Intumescent and Smoke Seals
Intumescent seals are thin strips that sit in a groove on the door edge or frame. In a fire, they expand and seal the gap shut. Smoke seals — brush or fin strips — block cold smoke before flames arrive.
Clean the groove, peel off the adhesive backing, and press the seal in flush. Run it in one continuous piece around the top and both sides — every break is a weak point.
If you’re installing a fire-rated glazed door, the same principles apply — take extra care around the glazing seal behind the bead.
Step 6 of 8: Install the Door Hardware
Fit the latch, handle, and lock using the manufacturer’s template. Drill only to the specified depth — over-drilling weakens the door core and voids the rating. The latch should throw at least 12 mm into the strike plate.
Fit the closer on the pull side at the specified height. Adjust closing and latching speeds so the door shuts fully and latches every time — even from a 10° opening angle. A door that doesn’t fully close is not a fire door.
Step 7 of 8: Seal Around the Frame (Firestopping)
The gap between the frame and the wall is a hidden weak point. Pack it with fire-rated mineral wool, then run a bead of intumescent sealant along the perimeter on both sides of the wall.
Don’t use ordinary expanding foam unless it’s specifically fire-rated. Standard foam burns away in minutes and leaves a clean path for smoke.
Step 8 of 8: Final Testing and Commissioning
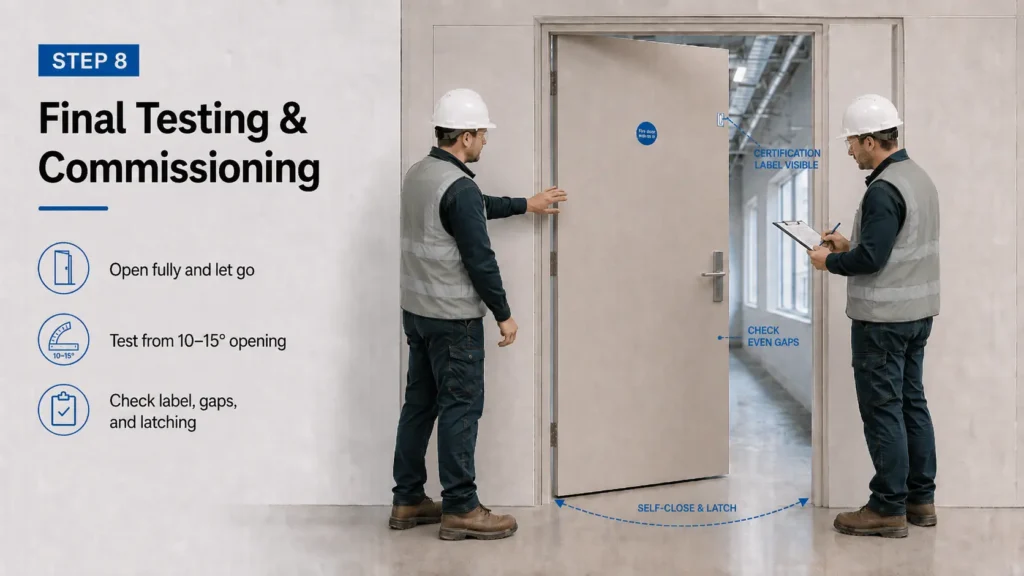
Once everything is fitted, test the door:
- Open it fully and let go — it should close on its own and latch.
- Open it just 10–15° and let go — it should still close and latch.
- Check all gaps once more.
- Confirm the certification label is visible and undamaged on the door edge.
Keep a record of the install: door type, rating, batch number, date fitted, and installer name. This paperwork is what proves compliance during an inspection.
Fire Door Installation Compliance Checklist
Correct installation is what transforms a certified fire door into a functioning passive fire protection system. Even an ISI-marked fire door can fail inspection if the gaps, seals, hardware, or firestopping do not match the tested specification.
For projects in India, fire door installation compliance is commonly assessed against:
- IS 3614:2023
- National Building Code (NBCS) 2026 fire and life safety requirements
- Manufacturer-approved installation guidelines
- Local fire authority and project consultant requirements
Because fire doors work as part of a compartmentation system, every component must be compatible and certified to work together.
Installation Compliance Essentials
Before handover, verify the following:
- Certification label remains visible and undamaged on the door edge
- Door leaf and frame match the tested fire-rated assembly
- Hinges, closer, latch, lock, handles, and seals are certified fire-rated hardware
- Frame is plumb, level, and securely anchored into the structural opening
- Gap tolerances comply with the manufacturer’s tested specification
- Intumescent seals and smoke seals are continuous, complete, and correctly fitted
- Firestopping around the frame uses approved fire-rated mineral wool and sealant
- The door self-closes and positively latches from all opening angles
- Any glazing uses certified fire-rated glass and compatible glazing systems
- No unauthorised drilling, cutting, trimming, or site modification has weakened the door core
Documentation Required for Inspection
Commercial projects, hospitals, hotels, high-rises, and institutional buildings often require installation records during safety audits and occupancy approvals.
Maintain documentation for:
- Fire door rating (30, 60, 90, or 120 minutes)
- Product certification and test standard
- Door model and batch number
- Hardware specification
- Installation date
- Installer or contractor details
- Inspection and maintenance schedule
Proper documentation helps demonstrate compliance during fire audits, licensing checks, insurance reviews, and facility inspections.
Fire door compliance does not end after installation. Regular inspections and maintenance are essential to ensure continued fire and smoke protection throughout the life of the building.
Common Fire Door Installation Mistakes to Avoid
- Uneven gaps from a twisted or out-of-plumb frame
- Missing or trimmed intumescent seals
- Short or wrong-type fixings that won’t hold the frame in a fire
- Standard expanding foam used instead of a fire-rated product
- Closer set too weak so the door doesn’t fully latch
- Damaged certification label, which voids the rating
Each one is small on its own. Together, they’re why fire doors fail inspections.
Technically yes — but only if you can follow the manufacturer's manual exactly and meet the gap, seal, and firestopping specs. For commercial and high-rise projects, an experienced installer is strongly recommended.
A single fire door takes 2–4 hours for an experienced installer, longer for first-timers. Multi-door projects move faster per door once the team is set up.
At least annually, and more often in high-traffic areas like hospitals, hotels, and schools. Check the seals, closer, and certification label every time.
Not reliably. Any damage to the door leaf, frame, seal, or closer compromises the rating. Damaged doors should be repaired by a qualified installer or replaced.